
What Makes a Great Clothing Tech Pack? (Top 5 Must-Include Elements)
In the fast-paced world of fashion manufacturing, a clothing tech pack serves as the blueprint for bringing a designer’s vision to life. This comprehensive document bridges the gap between creative ideas and physical garments, ensuring that every detail—from measurements to materials—is accurately communicated to manufacturers. For fashion brand startups and established labels alike, a well-prepared tech pack is the backbone of efficient apparel production, minimizing errors, reducing costly revisions, and maintaining consistency across collections.
Why Is a Tech Pack Crucial for Fashion Brands?
For fashion brand startups, a detailed tech pack is especially vital. Unlike larger brands with established processes, new designers often face steep learning curves when working with factories.

A complete tech pack eliminates guesswork, ensuring that suppliers understand exactly how a garment should be constructed. Established brands also rely on tech packs to maintain quality control, especially when producing across multiple factories or countries.
How a Strong Tech Pack Enhances Production Efficiency
A well-structured apparel production checklist within the tech pack helps:
-
Reduce Errors – Clear instructions prevent miscommunication, avoiding costly mistakes like incorrect sizing or fabric choices.
-
Speed Up Production – Factories can work faster when all details (stitching, labels, trims) are predefined.
-
Ensure Quality Consistency – Every sample and bulk order adheres to the same specifications, maintaining brand standards.
What’s Inside a Great Clothing Tech Pack?
While tech packs vary by brand and garment type, the most effective ones include these 7 must-have elements:
-
Detailed Garment Measurements & Specs – Exact dimensions for each size.
-
Flat Sketches & Technical Drawings – Visual construction guides.
-
Bill of Materials (BOM) – List of all fabrics, trims, and components.
-
Colorways & Print Guidelines – Precise color matching and artwork placement.
-
Construction & Stitching Details – Sewing techniques and seam allowances.
-
Labeling & Packaging Instructions – Brand tags, care labels, and packing methods.
-
Grading Rules & Size Charts – How measurements scale across sizes.
By mastering these components, fashion brand startups can streamline production, reduce waste, and create high-quality garments that meet their vision. In the following sections, we’ll break down each element in detail, providing actionable insights for building a flawless clothing tech pack.
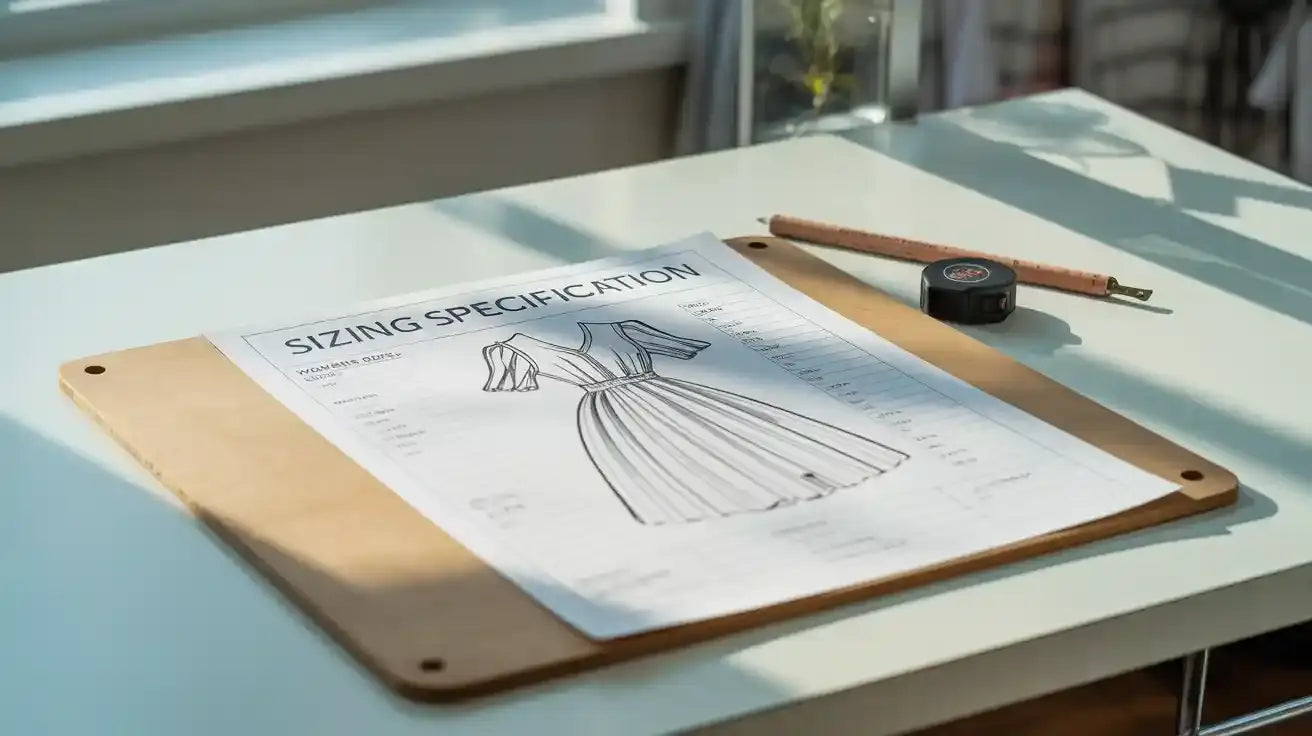
1. Detailed Garment Measurements & Specs: The Foundation of a Flawless Tech Pack
In apparel production, precision is everything—and it all starts with accurate garment measurements. A well-defined sizing specification sheet is arguably the most critical component of any clothing tech pack, serving as the ultimate reference for pattern makers, graders, and manufacturers. For fashion brand startups, getting these numbers wrong can lead to disastrous (and expensive) consequences like ill-fitting samples, rejected production runs, and unsatisfied customers.
Why Precise Measurements Are Non-Negotiable
Every item in your apparel production checklist hinges on measurement accuracy because:
-
Fit Consistency – Customers expect the same sizing across all styles and batches.
-
Manufacturing Efficiency – Factories can’t interpret vague instructions like "loose fit" or "cropped length."
-
Cost Control – Measurement errors discovered late in production may require remaking entire batches.
-
Brand Reputation – Inconsistent sizing is one of the top reasons for high return rates in e-commerce.
Key Measurements to Include in Your Tech Pack
While specific measurements vary by garment type (dresses vs. jeans vs. jackets), these are the universal essentials:
Basic Body Measurements
-
Bust/Chest – Measured at the fullest part for tops/jackets.
-
Waist – Natural waistline for dresses, pants, and skirts.
-
Hip – Widest point for bottoms and fitted styles.
-
Length – Shoulder-to-hem for dresses, waist-to-hem for skirts/pants.
-
Sleeve Length – Shoulder seam to cuff for long sleeves; armpit to hem for shorts.
Additional Critical Specs
-
Neckline – Circumference for crewnecks, depth for V-necks.
-
Armhole – Affects mobility and comfort.
-
Rise – For pants/skirts (low, mid, or high).
-
Cuff/Bottom Openings – Ensures correct taper for sleeves and hems.
Tolerance Levels: Defining Acceptable Deviations
Even with precise measurements, minor variations occur during cutting and sewing. Your clothing tech pack must specify tolerance levels—the permissible margin of error (e.g., ±0.5 cm for seams, ±1 cm for length). Example:
-
Stretch Fabrics – Tighter tolerance (±0.25–0.5 cm).
-
Woven Fabrics – Slightly looser (±0.5–1 cm).
-
Critical Areas (like necklines or zippers) – Minimal deviation allowed.
Tools to Create Professional Measurement Specs
-
CAD Software (e.g., Optitex, Lectra) – Generates digital patterns with exact specs.
-
Adobe Illustrator – Industry standard for flat sketches with measurement callouts.
-
Manual Measurement Charts – Simple grids for startups without advanced tools.
-
3D Virtual Sampling (e.g., CLO 3D) – Simulates fit before physical samples.
Example: Measurement Table for a Basic T-Shirt
|
Measurement Point |
Size S (cm) |
Size M (cm) |
Size L (cm) |
Tolerance |
|
Chest (Flat, Armpit-to-Armpit) |
48 |
52 |
56 |
±0.5 cm |
|
Body Length (Shoulder-to-Hem) |
64 |
66 |
68 |
±1 cm |
|
Sleeve Length (Shoulder-to-Cuff) |
20 |
21 |
22 |
±0.5 cm |
|
Neck Width (Front) |
18 |
19 |
20 |
±0.3 cm |
Pro Tips for Fashion Startups
-
Always measure finished garments (not just patterns) for accuracy.
-
Use a fit model to test samples in all sizes.
-
Update tech packs after each prototype iteration.
By investing time in meticulous measurements, fashion brand startups can avoid costly redos and build trust with manufacturers—setting the stage for scalable, high-quality production.
2. Colorways & Print/Embellishment Guidelines: Ensuring Visual Precision
In fashion design, colors and decorative details are what make your collection stand out—but without clear instructions in your clothing tech pack, even the most stunning designs can go wrong in production. This section of your apparel production checklist ensures that every hue, print, and embellishment is executed exactly as envisioned, preventing costly errors for fashion brand startups and established labels alike.
Why Defining Colors & Prints is Non-Negotiable
-
Avoids Costly Mistakes – A single misprinted batch due to vague color instructions can waste thousands of dollars.
-
Maintains Brand Identity – Consistent colors across collections build customer trust (think Tiffany Blue or Burberry Check).
-
Streamlines Sampling – Factories can proceed faster with precise Pantone references and print placement specs.
Color Specifications: Beyond "Light Blue"
Never rely on subjective descriptions like "sky blue" or "rust red." Instead, include:
1. Pantone Matching System (PMS)
-
The industry gold standard for color accuracy.
-
Example: *"Main Fabric: Pantone 15-3919 TCX (Serenity Blue)"*
2. CMYK/RGB Values (for Digital & Screen Printing)
-
Essential for graphics, DTG prints, and marketing materials.
-
Example: *"Logo Embroidery: RGB 34, 87, 122 / CMYK 92%, 70%, 40%, 20%"*
3. Lab Dip Approvals
-
Require physical fabric swatches dyed to your Pantone before bulk production.
-
Approve/reject with comments like "Lab Dip #3 too green; adjust toward sample #2."
Print & Embellishment Placement Guides
A general description like "floral print all over" isn’t enough. Specify:
For Prints (All-Over, Placement, or Repeat Patterns)
-
Scale: "Print scaled to 12% of original artwork size."
-
Repeat: *"Half-drop repeat every 25 cm vertically."*
-
Placement: "Center chest print starts 5 cm below neckline."
For Embroidery/Appliqués
-
Stitch Type: Satin stitch (dense, glossy) vs. running stitch (sketch-like).
-
Thread Count: "3D puff embroidery with 40,000 stitches, 2 mm lift."
-
Placement Coordinates: "Left chest logo: 8 cm from center front, 10 cm below neckline."
Common Mistakes to Eliminate
1. Color Mismatches
-
Mistake: Relying on digital mockups without physical lab dips.
-
Fix: Always approve dyed fabric swatches under natural and artificial light.
2. Misaligned Prints
-
Mistake: Not specifying seam allowances for patterned fabrics, causing mismatched stripes at seams.
-
Fix: Include "match stripes at side seams" in tech pack notes.
3. Unapproved Substitutions
-
Mistake: Letting factories replace unavailable materials without approval.
-
Fix: List backup options in your apparel production checklist, e.g., *"If Pantone 19-4052 is unavailable, use 19-3950 TCX after approval."*
3. Construction & Stitching Details: Engineering Garments for Quality & Durability
A clothing tech pack isn’t just about design—it’s a manufacturing manual. The construction section dictates how your garment should be assembled, ensuring durability, comfort, and consistency across production runs. For fashion brand startups, overlooking these details often leads to rejected samples or customer complaints. Here’s how to specify construction like a pro.
Essential Stitching Techniques
1. Flatlock Stitch
-
Use: Seamless, stretchy seams for activewear (e.g., leggings, sports bras).
-
Tech Pack Note: *"Flatlock stitch with 3-thread, 5 mm stitch width, matching thread."*
2. Overlock (Serged) Stitch
-
Use: Preventing fabric fraying on woven garments (e.g., t-shirts, dresses).
-
Specs: *"3-thread overlock, ⅜" seam allowance, contrast stitching not allowed."*
3. Chainstitch
-
Use: Decorative topstitching (denim hems, patchwork).
-
Example: "Chainstitch hem with gold thread, 1.5 cm from edge."
Seam Allowances & Reinforcement
-
Standard Allowances:
-
Wovens: 1–1.5 cm (prevents unraveling).
-
Knits: 0.6 cm (reduces bulk).
-
High-Stress Areas: Reinforce with bar tacks (e.g., pocket corners, belt loops).
-
Tech Pack Tip: Include a cross-section sketch of seam types (e.g., French seam vs. flat-felled).
4. Labeling & Packaging Instructions: The Final Touchpoints
Labels and packaging are your last chance to impress customers—and your first line of defense against compliance issues. For fashion brand startups, clear guidelines prevent mislabeled shipments or fines for non-compliant packaging.
Label Types & Placement
1. Brand Labels
-
Placement: Inside back neck (standard) or side seam (minimalist).
-
Specs: *"Woven satin label, 1.5 x 5 cm, heat-sealed edges."*
2. Care Labels
-
Regulations: Must include fiber content, country of origin, and care symbols (e.g., machine wash cold).
-
Example: *"Attach to side seam with 4-thread overlock, 1 cm from hem."*
3. Size Labels
-
Options: Sew-in, printed, or sticker labels (e.g., *"EU 36 / US 6"*).
4. Hangtags
-
Details: SKU, barcode, price, sustainability certifications.
-
Attachment: "Loop through neck label with 2 mm cotton cord."
Packaging Requirements
-
Polybags: "Clear, recyclable LDPE bags with 2 mm thickness, suffocation warning printed."
-
Folding: "Shirt folded with tissue paper, logo facing up."
-
Barcodes: *"GS1-128 barcode, 3 x 5 cm, placed on bottom right of hangtag."*
Global Compliance
-
US (FTC): Fiber content ≥ 5% must be listed.
-
EU (REACH): Banned substances list (e.g., AZO dyes).
-
Sustainability: *"Oeko-Tex 100 certified labels for EU market."*
Key Takeaways for Fashion Startups
-
Construction: Specify stitch types, seam allowances, and hardware like you’re teaching a beginner.
-
Labels/Packaging: Treat them as part of the product—non-compliance can halt shipments.
-
Global Growth: Research regional standards early (e.g., China’s GB18401 for textiles).
5. Grading Rules & Size Charts: Ensuring Consistent Fit Across All Sizes
Grading is the critical process of proportionally scaling a base size pattern into larger and smaller sizes while maintaining the garment's original design integrity. For fashion brands, proper grading ensures that a style fits consistently across the entire size range—whether it's XS or XXL—without distorting proportions or compromising comfort.
The grading process involves carefully calculated increments between sizes for each measurement point, typically ranging from 2-5 cm depending on the garment type and target market. For example, a women's top might grade 4 cm in bust circumference between sizes, while maintaining proportional adjustments in shoulder width and sleeve length.
Creating accurate size charts requires understanding both industry standards and your specific customer demographics. Start by selecting a base size (often Medium or Large) as your reference point, then develop clear grading rules that specify how much each measurement increases or decreases between sizes.
These increments should account for how the human body changes—not just gets larger or smaller—across sizes. For instance, plus-size grading often requires different shoulder-to-bust ratios than standard sizing. The most effective size charts include visual diagrams alongside numerical measurements, showing exactly where and how to take each measurement on the garment.
Conclusion
A professional clothing tech pack is the backbone of any successful apparel production process, serving as the critical link between creative vision and manufacturing precision. For fashion brand startups, investing time in developing a comprehensive tech pack pays dividends by minimizing errors, reducing costly revisions, and ensuring consistent quality across collections.

Leave a comment
This site is protected by hCaptcha and the hCaptcha Privacy Policy and Terms of Service apply.